<<PREVIOUS -
HOME -
CONTENTS -
NEXT>>
ASTROIMAGING -
![]()
<<PREVIOUS -
HOME -
CONTENTS -
NEXT>>
ASTROIMAGING -
![]()
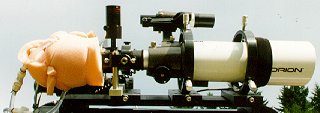
The telescope mount is the most important element of imaging. I started with a CG-11 and I am now using a C-8 on the G-11 mount. Keep all excess weight off the mount.
Start off with short focal lengths. One day I put the CB-245 CCD camera on the Orion 80mm ShortTube refractor (focal length = 400mm). Had a lot of fun and imaged all the Messier objects with it. Now I am using a C-8 Fastar (focal length = 406mm) with the SBIG ST-237.
Polar alignment needs to be good enough for 2 minutes. Image processing software will align the images latter.
Good images can be taken without guiding. The key is to take many short images and combine them. The G-11 mount periodic error repeats every four minutes. 30 seconds is the longest exposure before the mount errors get very bad.
An observatory is the best CCD astroimaging accessory. It makes imaging on a work night possible. I can be imaging in about 10 minutes after I come home from work.
Signal to noise is the key to image processing. I used to take 4 x 30 second images. Now I almost always take 31 x 30 second images. This takes about 20 minutes that includes the 10-second down load time for each image.
Image calibration includes:
Astroart (seeing more details and making pretty images) includes: