Sky Charts
Photography analysis
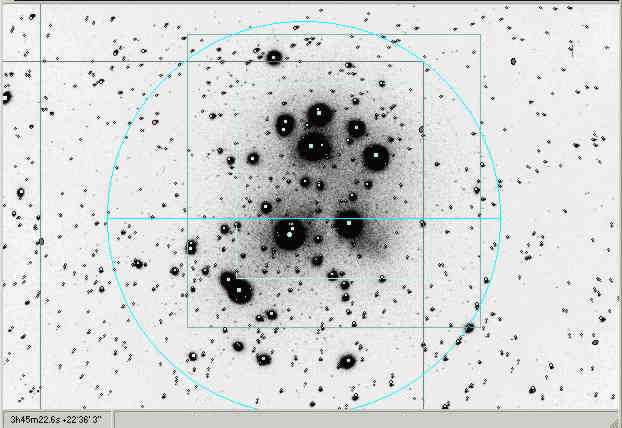
- 2nd case : M45 scan image
- Now we want to use an image that is not astrometrically calibrated. The goal is to simplify object identification. The precision of the method used ( by two points ) is sufficient in this case.
- We shall use a scan of an 18x24 paper photograph in BMP format. The original image was recorded on 103a-F film with a 500mm f/6.3 telephoto lens.
-
Click "Background image"
 .
. - Open "Images" directory.
- Select in the "Image color" box if you want to display the image using its own color map ( i.e.for a color photograph ) or use the RGB mean value as a grey level or select an individual color as grey value with the "Plane" box. If you use the grey value you can modify color palette as for FITS images.
- Click on the file name to display it in the preview window.
- To simplify display and printing of this image, change "Intensity" to "neg".
Click on image for full resolution
You can also preview the image at a larger dimension. Click "Full Size" and change the size with the "+" and "-" keys.
- Click "OK". The image is displayed on the chart, but at a wrong position as the coordinates are unknown.
-
Click "Projections"

- Select the projection type for the field of the photograph. Use "ARC" for a Schmidt camera or "TAN" for a telescope or photographic objective.
-
Click "Find"

- Check "Messier" and enter "Cat. Id." 45 .
- Click OK.
-
Click "Field width"

- Drag cursor to "+4°00' "
- Click "OK".
Click on a star to identify it on the chart, then press "Ctrl" key and
click at corresponding star position on the photograph. A message indicates
: "Enter second translation point". Repeat the same operation with
a second star.
The chart will now be displayed on the photograph. It is now easy to
obtain a better precision by using two fainter stars that have smaller
images on the photograph.
For a good correspondance it is necessary that the image center correspond
to the optical axis of the telescope otherwise it is not possible to obtain
the superposition on all the image surface, as the projection center of
the chart is alway at the center.
Click on image for full resolution
-
Click
 The chart will blink
with the image.
The chart will blink
with the image. - You can add labels the same way as in the first case.
-
To keep this chart in this state, click "Saved charts"
 ,
then "Save chart". Enter file name i.e. M45 then click "Save". You can
later reload this chart with the photograph in this exact state.
,
then "Save chart". Enter file name i.e. M45 then click "Save". You can
later reload this chart with the photograph in this exact state.
To change the blink delay click Alt +