Sky Charts
Catalogs and Objects Parameters
This panel allows you to select the catalogs you want
to use and set to up their properties.
Take a look at the catalog presentation for
more information on the usage of the catalogs
and their content.
Load and Save buttons:
These two buttons allow you to save a particular
configuration to a file and to retrieve it later.
To save the full program parameters use the OK button and then the main menu Preference - Save options.
Use memory cache:
When the box is checked the data for the different
catalogs are kept in memory to speed up the display.
To limit memory usage the cache is optimized to keep
only the last area used. Deactivate this option only
if you use a low memory machine (16MB), or if you
want to use a catalog for a field of view greater
than the authorized maximum, but beware that
performance may suffer.
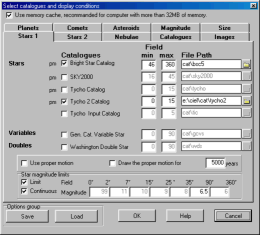
Use the first checkbox to select or de-select a
catalog.
Enter the smallest chart field of view this catalog
is used for. (Field Min)
Enter the largest chart field of view this catalog
is used for. (Field Max)
For better performance avoid overlapping multiple
catalogs for the same field of view.
If you don't install the catalog in the standard
folder, the File Path field is colored red. Use the
small directory button on the right to search for the
catalog location.
Proper motion box:
Only the catalogs marked with "pm" have this
information. If "Use proper motion" is checked, the
program uses the proper motion when it calculates the
position of the object for the current date.
It is possible to display the proper motion by
showing the displacement for a period of 1-9999 years
in the form of a line.
Star magnitude limits box:
Restrict the star visibility to a certain magnitude
according to the chart width.
Check "Limit" to activate the magnitude limitation
to avoid overcrowding the chart.
The table on the right indicates the magnitude limit
for each field of view range.
If you check "Continuous" the magnitude limit is calculated to always show the same number of stars for each field of view. In this case only the 35°-90° box is active to set the reference magnitude at 90°.
A second page is used for additional star catalogs.
Use it in the same way.
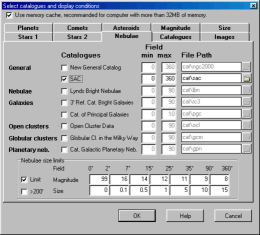
Use the first checkbox to select or de-select a
catalog.
Enter the smallest chart field of view this catalog
is used for. (Field Min)
Enter the largest chart field of view this catalog
is used for. (Field Max)
If you don't install the catalog in the standard
folder, the File Path field is colored red. Use the
small Directory button on the right to search for the
catalog location.
For better performance and to avoid objects
overlapping do not use multiple catalogs for the same
type of object and the same field of view.
Specifically if you use either the NGC or the SAC, do
not use any other for the same chart.
Nebulae limits box:
Restrict the nebulae visibility to a certain size
and magnitude according to the chart width.
Check "Limit" to activate the limitation in order to
avoid overcrowding chart.
The table on the right indicates the magnitude and
size limit for each field of view range.The size unit
is arc minute.
Select ">200'" to show the very extended objects,
such as Ursa Major cluster, that are not plotted by
default to clean up the chart.
Stars and Nebulae catalogs prepared with the CATGEN software:
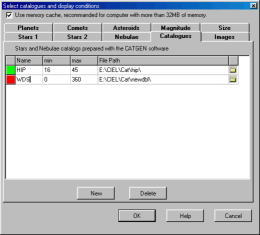
Use the New button to add a line for a new catalog
and the Delete button to remove the line selected
with the cursor.
Click the button ![]() at the right to select a new catalog.
Select the .hdr file that contains the description
for the catalog. In the case of an error the cell is
boxed in red.
at the right to select a new catalog.
Select the .hdr file that contains the description
for the catalog. In the case of an error the cell is
boxed in red.
Then modify the Min and Max field according to the
same rules as described for the stars and the nebulae catalogs. The display
limitations indicated in the previous pages also
apply to these catalogs.
Click the first column to set it to green to
activate the catalog.
Images
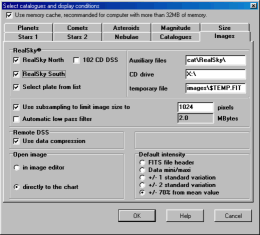
Images loading options.
Realsky options:
- Select the available CD's (North, South, 102
CD).
- Select plate from a list of available plates or
automatically select the best centered plate.
- Path where the support files are installed.
- CD drive path or path which contains copies of
RealSky files.
- File name for the temporary FITS file used for
extraction.
- Use sub sampling to automatically limit the
temporary file size to a reasonable value.
- Automaticaly apply a low pass filter to limit the
compression effect to the sky background.
Remote DSS options:
- Use Gzip compression to download the image file.
This reduces the file size by a factor of two or
three .
Open Image options:
- To the image editor to modify some parameters or
directly to the chart.
- Select default intensity range values used to
display the image.
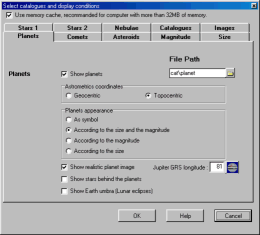
Click "Show the planets" to show or hide the
planets.
The File Path indicated is where the files of the
planets, comets and asteroids are located.
The following options are available:
- Select between geocentric or topocentric position.
- Select the drawing type.
- Show a realistic image of the planet when drawing according to the size and/or magnitude.
- Reference longitude of Jupiter Great Red Spot.
- Show the stars through the planets. This is useful to determine the end of an occultation.
- Show the Earth umbra at the distance of the Moon to visualize a Lunar eclipse.
The ![]() button provides direct access to the JUPOS
web page to obtain the most recent measurement of
Jupiter's GRS longitude.
button provides direct access to the JUPOS
web page to obtain the most recent measurement of
Jupiter's GRS longitude.
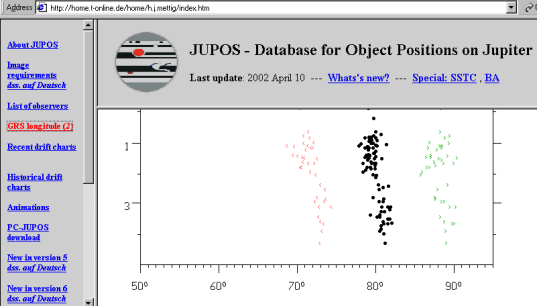
In the above example the GRS longitude is 81° at the beginning of April 2002.
You may replace the planet's texture file with your
own. The files are located in the folder
cat\planet.
It is very important to respect the orientation;
place the North at top, -180 longitude at left and
+180 longitude at right, the meridian 0 must be at
the image center. The exception is Jupiter, in which
case you must put the GRS at the image center.
Comets:
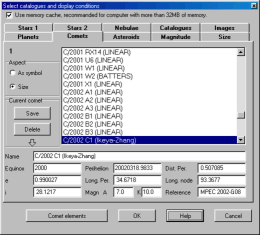
Select one or more comets from the list using the
mouse and the standard Ctrl or Shift key.
The appearance can be a symbol or a drawing
representing the total magnitude, the size of the
coma and the length and direction of the tail.
You can enter data for a new comet at the bottom of
the screen and save this information in a file by
pressing the "save" button.
You can obtain this information directly from the
Internet by using the button "Comet elements" or the
menu Online resources.
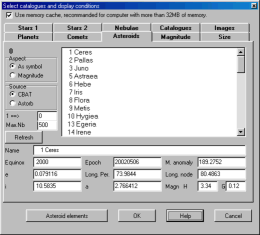
Select one or more asteroids from the list using the
mouse and the standard Ctrl or Shift key.
The appearance can be a symbol or a drawing
representing the magnitude.
The list can be obtained from two sources:
-
Asteroids CBAT: This list of bright asteroid at the
opposition during the current year can be updated
annually from the Internet by using the button
"Asteroid elements" or the menu Online
resources.
-
Astorb: Edward Bowell, Lowell
Observatory The file must be placed in the
directory "cat\planet" and it has to be called
ASTORB.DAT. Please convert this file to DOS format
(cr+lf for EOL). You can also directly load this
file from the Internet with the option Online
resources.
Be aware that the size of this file has become very large in the past few year as the number of known asteroids increases rapidly.
The maximum number which can be shown at one time is 30,000. You can change the number of entries by setting "Max.Nb" between 5,000 and 20,000. Enter the number of the first asteroid to be displayed in the "1=>" field.
If you want to see all of the 150,000 asteroids in
the Astorb catalog you should use the option Bulk calculation of
asteroids.
External catalog according to the magnitude:
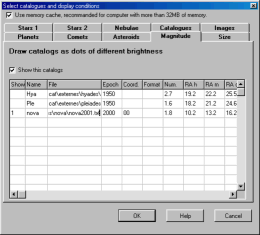
This is the description of the format of a star
catalog using a formatted text file subdivided in
columns or separated by a separator character which
is added to the charts if the first column of each
entry is not blank. There are many sample catalogs
available to download which can help you learn how
this works.
Reserve this option for a small data set or to quickly add a newly discovered nova. For larger catalogs the preferred way is to build a binary formatted catalog using the Catgen tool which is much more efficient.
A right mouse click to a line displays a menu:
- Open a file containing the catalog definition .cdm
- Save the current line to a file .cdm
- Delete the current line
Here is the detailed format for each column:
1- This catalog is active "1" or inactive
" ".
2- Catalog name which will be used in the
identification
of the object.
3- Complete file path.
4- Epoch of the
coordinates.
5- Coordinate type, first character = RA
type,
second character = DEC
type.
RA type:
0 or blank = Right Ascension in
hours.
1 = Right Ascension in
degrees.
2 = Right Ascension in
radians.
DEC type:
0 or blank = Declination in
degrees.
1 = distance from the South pole (SPD)
in degrees.
2 = Declination in
radians.
6- File format:
F or blank = Fixed format. The field
definition indicate the starting position and the
length of each element.
TAB = Variable format. The field
separator is a tabulation character. The field
definition indicate the field number.
SPACE = Variable format. The field
separator is a blank space character. The field
definition indicate the field number.
any other character = Variable format.
The field separator is the specified character. The
field definition indicate the field
number.
7- Identification name of the
object.
8- Right Ascension, hours or decimal Right
Ascension.
9- Right Ascension,
minutes.
10- Right Ascension,
seconds.
11- Sign of the Declination (mandatory if
DD MM SS)
12- Declination, degrees or decimal
Declination.
13- Declination, minutes.
14- Declination, seconds.
15- Magnitude.
16- Color index B-V.
17,18,19- Description or supplementary
information.
20- Highest magnitude in this
catalog
External catalog according to the
size:
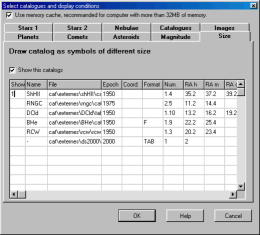
This is the description of the format of a nebulae
(or other object) catalog using a formatted text file
subdivided in columns or separated by a separator
character which is added to the charts if the first
column of each entry is not blank. There are many
sample catalogs available to download which can help
you learn how this works.
Reserve this option for a small data set or to quickly add a specific object. For larger catalogs the preferred way is to build a binary formatted catalog using the Catgen tool which is much more efficient.
A right mouse click to a line displays a menu:
- Open a file containing the catalog definition .cds
- Save the current line to a file .cds
- Delete the current line
Here is the detailed format for each column:
1- This catalog is active "1" or inactive
" ".
2- Catalog name which will be used in the
identification
of the object.
3- Complete file path.
4- Epoch of the
coordinates.
5- Coordinate type, first character = RA
type,
second character = DEC
type.
RA type:
0 or blank = Right Ascension in
hours.
1 = Right Ascension in
degrees.
2 = Right Ascension in
radians.
DEC type:
0 or blank = Declination in
degrees.
1 = distance from the South pole (SPD)
in degrees.
2 = Declination in
radians.
6- File format:
F or blank = Fixed format. The field
definition indicate the starting position and the
length of each element.
TAB = Variable format. The field
separator is a tabulation character. The field
definition indicate the field number.
SPACE = Variable format. The field
separator is a blank space character. The field
definition indicate the field number.
any other character = Variable format.
The field separator is the specified character. The
field definition indicate the field
number.
7- Identification name of the
object.
8- Right Ascension, hours or decimal Right
Ascension.
9- Right Ascension,
minutes.
10- Right Ascension,
seconds.
11- Sign of the Declination (mandatory if
DD MM SS)
12- Declination, degrees or decimal
Declination.
13- Declination, minutes.
14- Declination, seconds.
15- Size.
16- Unit for the size:
1 : degree
60 : minutes
3600: seconds
17,18,19- Description or supplementary
information.
20- Color, a constant value which
corresponds to the colour defined
for the stars.
21- Symbol shape, constant
value.
1: circle.
2: square.
3: diamond.
22- Blank=linear scale, 1=logarithmic
scale.
(useful if the size has to represent the
intensity, i.e. in the
case of radio sources).
Warning!
Most of the catalogs available on CD-ROM or from the
Internet, as well as Astorb.dat, are in UNIX format
(end of line = LF). It is important to convert them
to DOS format (end of line = CR+LF) before you use
them with "Sky Charts" as external catalogs. There
are several programs and utilities to accomplish this
task. Amongst them the editor PFE or
the TLF utility.