|
current page:
|
How Telescopes WorkHaving a basic understanding of how a telescope works will help any observer get the most out of his or her equipment. We present this guide as a basic overview of telescope optics for the amateur astronomer. Light PathsTelescopes "do their magic" by gathering and focusing light. In this section, we'll review how the eye sees, and how using a telescope can help you see things that are too small or faint for your unaided eye to view. One of our standard targets in astronomy is the stars. It just so happens that they are an "ideal" optical target; they are so distant from us (excepting, of course, our nearby Sun), that they appear as points of light to us, even when they are notably magnified. Indeed, all the light rays reaching us from a distant star can be considered to be parallel; this makes for easy modeling. In the following examples, we will use the light from one distant, point-like star to show how a telescope gathers and focuses light. (Later on we'll expand the model to explain magnification and the viewing of objects which appear larger than "points".) The EyeSince we're mainly considering visual observing here, let's start out with a look at how the eye works. Again, we'll use the light from that one star up in the sky for this model. The light rays from the star shower down all over the landscape; the observer only sees those rays which enter the pupils of his or her eyes. 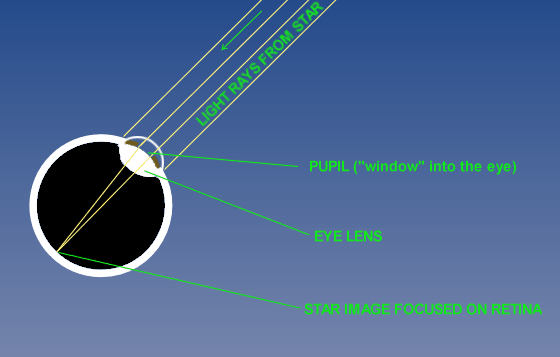
When they enter the eye, the light rays pass through the lens of the eye; it focuses them to a point on the retina, which lines the back half of the eye. Photoreceptor cells there translate the light into nerve impulses; the brain interprets those, and "sees" the point-like star in the sky (assuming the viewer has good distance vision; if not, the lens doesn't focus a sharp image on the retina, and the observer sees a blurred image). Adding a TelescopeThe simplest optical design of telescope to start out with is the refracting type; it uses a lens (like the eye does) to gather and focus the light (to refract means to bend the light). The other main type of telescope is the reflector; it uses a mirror or mirrors to gather and focus the light; we'll look at those later.
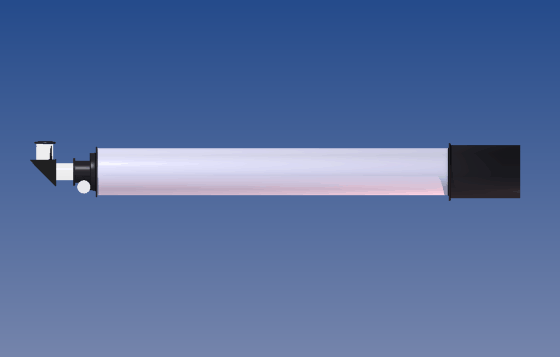
The starlight is entering the system from the right (hover your mouse over the Components box to see the optics of the telescope, and over the Light Path box to view the light rays passing through the system). The main function of the telescope is to gather a large bundle of incoming light rays, condense it down, and re-focus it to send it into the eye as a smaller (brighter) beam of once-again parallel rays. That beam is focused by the eye's lens into a point on the retina, just like the starlight was in the unaided eye in the first diagram; the image is notably brighter, though, since the telescope gathered light over a much wider area. Obviously, the larger the diameter of the telescope's Objective (main lens or mirror) is, the brighter the star image will be; also, larger diameters allow fainter stars to be viewed (by gathering enough of their sparse rays for the eye to detect them). MagnificationWhile light gathering is the #1 job of the telescope, its other big duty is to provide a magnified, well resolved image. To study how magnification is achieved, let's imagine adding a second star into our view. If the two stars are close to each other in the sky, their two sets of light rays reach the observer at slightly different incoming angles; their images then focus at slightly different spots on the retina, and the brain sees two points close together. In the telescope, the Objective lens or mirror also forms an image of the stars, at a point in front of the Eyepiece called the Focal Plane. The Eyepiece is actually just a magnifying glass which is the observer uses to look at the Focal Plane image. The two bundles of light rays (one from each star) emerge from the Eyepiece (and enter the eye) separated by a wider angle than the one at which they entered the telescope; their images then focus farther apart on the retina, and the brain sees them more widely separated, or in effect "closer up" than without the telescope. The longer the focal length of the telescope objective is, the farther apart the star images will be on the Focal Plane, and the higher the power of the Eyepiece, the more the Focal Plane will be magnified; these two properties together (focal length of telescope and power/focal length of eyepiece) determine the total magnification provided by the system (see the 'Scope Computer page for more information on calculating magnification). How does this apply to other objects you might observe? Mentally picture anything you might look at (planets, galaxies, whatever) as being made up of any number of points, each of which is emitting light rays like our model stars. The more you magnify, the more you separate all the points apart, and the larger the object appears! FocusingAgain, in theory, what we want to achieve is to have the light rays from our model star emerge from the Eyepiece in a parallel bundle, to be focused by the observer's relaxed eye lens to a point on their retina. But in reality, some folk's eyes don't focus parallel rays into a point; if you are near- or far-sighted, you need the bundle of rays to either be diverging or converging to reach focus as a point on your retina. This is easily achieved with a telescope; by adjusting the focus of the Eyepiece (generally its in and out position), the alignment of the light rays is varied, and near-sightedness or far-sightedness can easily be corrected for with the twist of a knob. (This explains why different people will adjust the focus of a telescope differently.) Unfortunately, astigmatism (which is caused by a directional misshaping of the eye's lens) cannot be corrected by adjusting the telescope; people with astigmatism will have to keep their corrective lenses on while observing (as opposed to the simply near- or far-sighted, who can remove theirs if they like). More Telescope DesignsAbove we looked at a simple refracting telescope. The "base" version of that 'scope is the Achromat, which has a two-element Objective Lens (single-lens telescopes perform so poorly as to not be of any real use to the observational astronomer). At a higher cost, you can make one of the lenses of a more exotic material, and even add in a third element, to achieve an "Apochromatic" design; the goal with these is to reduce or eliminate the color dispersion that a simple Achromat still has, and to improve contrast and sharpness. Basically, you get what you pay for, but a well-made simple Achromat can give a good deal of observing pleasure. It should be noted that binoculars are actually just a pair of refracting telescopes mounted side-by-side; in their optical path is a set of prisms which flip the image around to keep it right-side-up (something that isn't generally worried about in astronomical telescopes).
On to other designs. The simplest reflecting telescope design is the Newtonian Reflector; it was invented by Sir Isaac Newton, and is a "workhorse" design for the amateur astronomer, providing fine images at a very economical cost-per-aperture. The Newtonian telescope can be found on a number of different mountings; in one simple rocker-box design, it is commonly known as a "Dobsonian".
As with the Refractor diagram above, the starlight is entering from the right. Since the light gathering and focusing is done by the primary mirror, the light heads back up the tube, rather than coming out the rear. The flat Diagonal mirror (also called the "secondary") reflects the focused light out the side of the telescope to the eyepiece. Otherwise, the optics are performing the same jobs as those in the Refractor. Using a mirror rather than lenses has some benefits; only one face of the objective needs to be optically figured (as opposed to both faces of each of the multiple lenses in a Refractor); and the light doesn't pass through the mirror (its reflective coating is put on its front surface), so the glass can be much poorer quality. Thus, large reflector objectives can be made much less expensively than similar sized refractor objectives. Larger Newtonian reflectors may be mounted in collapsible openwork assemblies rather than solid tubes for increased portability. Mirror systems also don't face the color-correction problems that lens systems do (all colors of light reflect from mirrors the same way, but they refract through lenses by varying amounts). While the Refractor and Newtonian designs are popular, there are a number of others available to the amateur astronomer. Another major class is the Catadioptrics; these systems combine both mirrors and lens elements. One of their main features is a "folding" of the optical system, to fit a long effective focal length into a shorter tube. Indeed, many Catadioptrics will have much longer effective focal lengths (and hence a range of usable magnifications which is shifted much higher) than Refractors or Newtonians which are in longer tubes. One of the most common Catadioptric designs is the Schmidt-Cassegrain.
The Schmidt-Cassegrain objective (primary) is a mirror, as in the Newtonian, but it has a deeper curve than most Newtonians, bringing the Focal Plane in much closer. But instead of a flat secondary mirror, the Schmidt-Cass's secondary is curved with a positive curve (like a bump, rather than a dish like the primary is); this takes the final portion of the light cone from the primary and stretches it out, bouncing it back through a hole in the primary to the waiting diagonal and eyepiece. Interestingly, the effective focal length of the telescope is determined by the conformation of the objective's light cone at the Focal Plane (the stretched part, not the steeper, pre-secondary section); the telescope magnifies the same as if its entire light cone had the same angle that just the final section does (and if you extrapolate that final light cone backwards from the diagonal through the secondary and on out until it reaches a diameter equal to the primary, you can see that you'd have a very long telescope indeed). The Corrector Plate is added to the system to make up for some image defects which come from using such a short focal length, spherically shaped primary mirror. It may look flat, but actually has a slight optical figure (and it also makes a handy mounting place for the secondary). In some Catadioptric telescopes, instead of shifting the eyepiece, focusing is accomplished by shifting the primary or secondary mirror in and out. The Maksutov is another popular type of Catadioptric telescope; it is similar in layout to the Schmidt-Cass, but has different curves on the primary and secondary mirrors and a thicker, more deeply curved corrector. |
||||||||||||||||||