The Practical Telescope
by Dennis Allen
Last year, I got an extraordinary break. Tom Waineo, a retired optician, offered to grind me a mirror. You may remember Tom Waineo as the creator of the desktop polisher, featured in last year's Sky & Telescope.
Anyway, Mr. Waineo said he had a badly chipped 2" Cervit blank. For not more than cost, he could turn that glass into a quality 24" mirror. Well, I jumped at the chance!
With a 104.5" focal length, I figured the resulting dobsonian telescope would be about 8' long. I little long for my 12'x14' observatory, but who cares? For 24 inches of glass, I'd make it fit!
The first step was to figure out the size of the diagonal. I wanted the diagonal to work for both visual and photography. Some people use two diagonals, but I didn't want to fiddle around with expensive glass all the time.
Fortunately, I already created an Excel spreadsheet to compute airy circle sizes and Strel ratios. After playing with the numbers, a 4.25" diagonal gave a .93" Strel ratio and a 1.03" airy circle. 35mm film has a 1"-by-1.25" area, so a 1" square area should expose most of the film. I was going to buy a 4.25" diagonal, but Mr. Waineo talked me into letting him grind it.
The next step was to order a 24" truss tube kit from Astrosystems. With this kit, you assemble the mirror box and rocker box. You can assemble the focuser cage or have Astrosystems do it. To save time and effort, I decided to order the pre-assembled cage.
The owner of Astrosystems wrote a nice computer program. Punch in the numbers, and you get a printout of the dimensions of all the 3/4" wood pieces you would need for the bottom assembly, rocker box, and ground plate.
In addition to the printout, Astrosystems sent me a book illustrating these calculations. Every possible weight and measurement was taken into account. To change the balance of this scope, you simply change the length of the mirror box: a longer mirror box for a heavier top assembly, and a shorter box for a lighter front end.
Astrosystems suggested using aircraft plywood, but the nearest dealer was an hour drive away. So I settled on A-A cabinet grade plywood.
I cut out small pieces of paper (1/8" to the inch) representing all the 3/4" panels I would need. I arranged these pieces until they could fit on two sheets of plywood (don't forget to include an extra 3/8" for the cutting blade).
The next step was to head for the lumber company, buy my two sheets, and have them cut it up. Very quick and neat. I talked a friend into jigger sawing the hole needed for the top of the mirror box.
Next, I glued and screwed my side panels to the rocker box, making solid 1.5" side panels. Then came the hard part. Cutting the altitude circles. The 18" altitude wheels, provided in the kit, have to sit 9 inches above the bottom of the rocker box. The center point would thus sit well above the top of the rocker box. So I butted the two side panels together and tacked my drawing stick on each panel so I could draw circles on the opposite panels. Then I cut the circles out with a jigger saw.
After rough sanding all the pieces, I glued and screwed the mirror box together. For added strength, I also screwed pieces of 2" by 2" on the inside corners.
Assembling the rocker box took slightly longer. For some reason my front and back pieces were a little short. Turned out that the bottom plate was about 3/4" too wide. Still enough lip for the wagon wheels, but something you need to keep an eye on.
I glued my back-ebony Formica to the bottom of the rocker box. I drilled out two holes at the top of the mirror box for two of the truss tubes. I drilled and mounted the Teflon pads on the ground plate. I also drilled out the center hole to the rocker box.
Now came the wood dope. Unlike aircraft plywood, cabinet plywood has gaps between the glued sheets. Every gap had to be filled. I also doped over all the screw heads. Then I had to sand down the excess dope off. I had to repeat this process a couple of times.
In all this sanding, I found another reason to use aircraft plywood. Cabinet wood is only a 5 ply, with a very thin outer ply. I quickly found that by sanding too deep or sanding too much off a corner exposed the dark secondary ply.
Now was a good time to paint the inside of the mirror box black. I figured what little I'd spilled could be sanded off. I applied two coats of interior flat black. Careful out to finger this surface, as fingerprints tend to stick out.
Thank goodness for stain. After another sanding with a finer grain paper, I gave everything two coats of Mini-Wax 'Golden Oak'. After applying each coat, I let the wood sit a couple of minutes before wiping the excess off. This stain did a real good job of hiding wood dope and other 'mistakes'.
For a finish coat I got some Helmsman Spar-Erathyane clear semi-gloss. A good indoor-outdoor paint. It should stand up to dew. The first coat I laid on thick. The following coat raised the grain, requiring a fine sanding. I had to coat and sand a couple of times, until the wood was smooth to the touch.
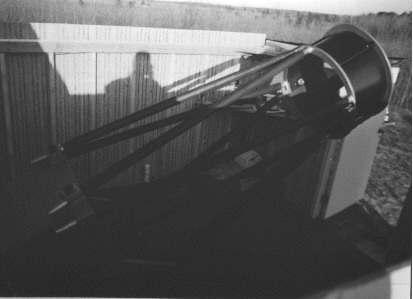
All I had left to do was to mount the truss tube blocks and the altitude wheels. But I didn't have the mirrors yet. So with winter approaching, final assembly had to wait for better weather.
While waiting for spring, I ordered an equatorial platform from Tom Osypowski. This platform has dual axis control, allowing prime focus photography for up to an hour at a time.
When spring finally arrived, I had everything I needed for final assembly. I got help and mounted the truss tube blocks to the mirror box. Then, with help from a fellow society member, I assembled the telescope at our society's observatory. We used a couple of C-clamps to hold the altitude wheels, while sighting on a radio tower. After some adjustments, we found the correct balance point for the wheels.
I didn't waste any time getting my telescope up to my observatory. It took two people, but we managed to assemble the 24" telescope.
Collimation wasn't easy! Before final assembly, I took a lazy suzan and spun the main mirror to mark the center. I also used a template to mark the center of the diagonal, offset and all. Once assembled, the next step was to get the focuser cage centered. So I had to get the mirror box perfectly leveled. I adjusted the truss tubes until the cage was leveled. Then I used a plumb to make sure the diagonal holder was centered to the main mirror.
Probably the most useful tool I ever purchased was a laser collimator. Once I got the focuser cage centered, it took only 10 minutes to collimate the telescope. I already saw first light during the last full moon. I couldn't see faint objects, but at least my airy disks are round and centered.
Oh sure, I made many mistakes building this telescope. Perhaps the biggest was using a jigger saw to cut my rocker box circles. The first side the cut was great. But on the other side, the blade got away from me. A real bad inside angle. By the time I finished sanding everything even, I lost a good 1/4" and both sides. And still not totally perpendicular. Next time, you can bet I'll use a band saw.
Another mistake was in the front of the rocker box. For some reason, the front panel was more than five inches too high! It didn't allow the fully assembled telescope to be positioned horizontally. I couldn't close my observatory until I had cut notches in this panel to make room for the lowest truss tubes. Had I checked the fully assembled telescope beforehand (Hint: HST), I could have corrected the problem quicker and easier.
But I lucked out, too. The balance point for the altitude wheels turned out to be 2 inches low. I had to notch the rocker box for my two front truss tubes, but so what? That raised the mirror box just enough to clear my azimuth bolt and computer encoder.
So far I'm happy with what I got. I wouldn't, however, consider this telescope portable. In fact, I plan to adjust the telescope for photography and use an eyepiece extension tube for visual use. The truss tubes are just too difficult to adjust frequently.
1996 Events
Well, I finally had some real chances to use the telescope. So far, the telescope is meeting all expectations. The visual images are real good! At first, however, I was awfully disappointed with views of M31. Then I found the problem. You see, at this time of year this object rises very late. By 3 o'clock in the morning, my diagonal was wet with dew. So I bought a 12V hair dryer from Orion. Now I can see two dust lanes in M31, with a hint of a third.
Dew was also getting to my primary mirror. So I had the local awning company sew me a black shroud (telescope cover). It works! The shroud keeps the dew out, keeps stray light out, and helps steady the heat turbulence.
And just as I was breaking the telescope in, guess what? My equatorial platform arrived. It took two people to install the platform. Runs like a dream. Easy to polar-align and can run for over an hour.
Found out one problem (or feature) of the platform. When I move the telescope, if the platform is already rising (last 30 minutes), it tends to slide back down. In other words, if you move the telescope around all night, you may only need to reset it a couple of times. But this slipping, however, goofs up the NGC-MAX computer. So to use the computer, I have to install the shipping block. Which means I have to turn the platform off.
Though I haven't used it for an entire year, I'm optimistic. I've already taken prime focus pictures and wow! Do they look fantastic! Can't wait for Orion to rise. I've always want to do a good horsehead!
2002 Events
Well, I've had my telescope a couple of years and couldn't be happier. I've taken fantastic prime focus and piggyback pictures, which can be seen on this web site.
Had a few problems, very minor. The platform was still slipping, goofing up the NGC-MAX. So I took the telescope apart, cleaned it up and gave the Teflon pads a coat of car wax. The telescope moves a lot easier now. Still a little top heavy, but now I can use the NGC-MAX. Remember not to put on TOO much wax. Oh, I had to remount my computer's altitude encoder. It kept slipping. I mounted it to the arm instead of the wagon wheel.
The mice kept chewing on my telescope shroud, so now I store everything in a big self-sealing tote. Otherwise, everything is fine. My only desire now is to get the main mirror recoated. The current coat is ok, but you shouldn't be able to shine a flashlight through it.
2014 Events
After almost twenty years of use, my big scope is still doing great. Went to using a Canon Rebel XT, then a Rebel XSi, which has a live view feature. Prime focus shots that would take a half hour with film I can now do in five minutes. Amazing!
After reading an article about cleaning mirrors in S&T, I decided to clean my 24” mirror. Started off with distilled water and a little bit of dish soap. Used surgical cotton to roll and lift the dirt out. I tried to be careful, but couldn’t get out several dirt specks and ended up putting a couple small streaks in the mirror. Anyway, I rinsed the mirror with more distilled water. As the mirror dried I used a can of air to blow off the water beads that were forming (don’t spray all at once or you’ll get cold liquid out of the can). Despite the streaks and dirt specks, my mirror hasn’t been this clean in years. I accidentally washed off my center dot. My mirror has a thin coat, however, so I can see the laser beam on the back side. Was easy enough to make a new center mark on the back side.
Note: One thing I didn't use was Isopropyl Alcohol. I understand why you want to use it, so that it evaporates completely. But even today’s 99% stuff will leave a residue. Not worth it.
2016 Events
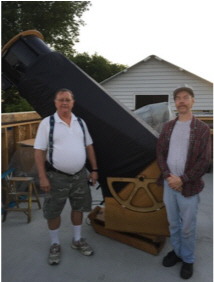
When the local astronomy club rebuilt their big 16'x20' roll-off roof, the original plan was to move the club 15" telescope into it. It became clear, however, the 15" telescope was going to need a lot of work. So the club decided to mothball the 15" telescope for now and let me to put my 24" telescope in the big roll-off. As it turned out, well worth the move. The big roll-off is ideal for this telescope. The walls are far enough away that the telescope never touches them. No need for the telescope to sit on two layers of bricks, so even looking straight up is comfortable on an eight foot ladder. With my big telescope closer to home, I've already used it more times this summer than the last couple years up north. Images are fantastic, at least that's what the club members tell me (might have to install a coin operated device so I can get a turn)<g>
2017 Events
At last year's move, my big telescope cleaned up pretty good. Even got a chance to spin the main mirror and put down a new center marker. But after twenty years of mice nests, the top of the mirror box got soiled. This summer I sanded the top of the box and actually got much of the mice stain out. Then I put down a new coat of stain and two fresh coats of Spar-Urethane. Not perfect, but not bad.
This summer I also spent time aligning the platform. By the end of summer, I was taking 90 second unguided shots. 90 seconds! I talked to Tom Osypowski of equatorial platform. He was shocked as well! I told him my south alignment star wasn't moving, but my east alignment star had a small right ascension drift. Tom suspects that drift must be caused by weight unbalance. Instead of messing with the alignment, Tom suggested I get a better camera. Something like a Canon T6, that would allow me to set a higher ISO and thus a shorter exposure.
2021 Events
Last couple years our club got hooked on stacking images. It's wonderful to find an object and grab several dozen 45 second shots before the platform runs out. And I don't have to off-axis guide all night long. If I could have made these images twenty years ago, I would have been selling posters at the summer art fairs. For details, click here.
This summer I plan to go after more difficult objects. After the season is over, I plan to send my main mirror for a recoat. I also plan to rebuild the front cage and drop in a better focuser.
[Return to Top]
[Go to Home Page]
Copyright © 2005 Muskegon Astronomical Society, Inc.
This web page was last updated 03/26/21