The Practical Observatory, Roll-off Design
by Dennis Allen
Our society has recently finished constructing our third roll-off roof observatory. I wrote this piece to help anyone wanting to build a roll-off observatory. Roll-off roof buildings are simple to build, easy to open, cool off quickly and require little maintenance. Except for some extra hardware like channel and caster wheels, building a roll-off is not much different from a conventional shed.
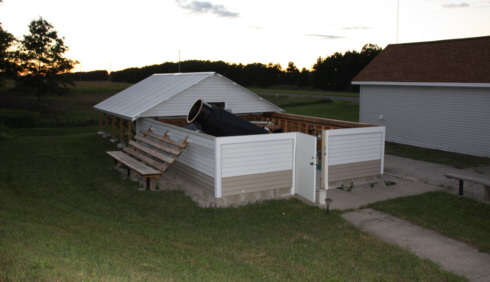
The design is simple: What you want is a building with a roof rolling north and the entrance door on the south wall. When the roof is open, the doorway gives your telescope access to all objects crossing zenith, all the way down to the southern horizon. To the north, any object blocked by the open roof will eventually swing around overhead.
Note: If you have to roll the roof in a direction other than north, don't worry about it. Been there, done that! The basic design remains the same.
To start, make the roof with scissor trusses. Also known church trusses, they have a 6/12 outside pitch and internal 3/12 pitch. Have the lumber company fabricate your trusses (strong and lightweight). I usually go with 4' centers. The northern truss can be a regular truss, but the rest need to be scissor trusses. Cover your trusses with 2"x4" purlins and White McElroy corrugated sheet metal, lightweight yet strong. The length of the gable overhang, the skin of the gables, the kind of capping, the soffit over the truss ends, etc. will be up to you.
Now anchor the trusses to a pair of 2"x6" truss sills with brackets. Under each truss, bolt on a set of 5" or 6" caster wheels to the truss sill. These caster wheels will ride in 3" channel. This channel will sit on standard 2"x4" framed 16" centered 4' high walls and 4' centered 4"x4" outside posts. FYI: Hot-rolled steel channel might get a little rusty, but it's much cheaper than aluminum and doesn't require extra support between the outside posts.
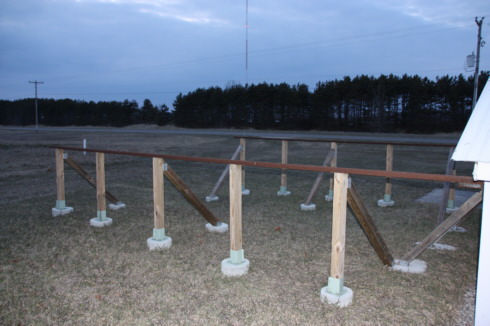
Whether you pour a concrete slab or make a wood floor, up to you. Whether you skin the walls with pre-painted OSB, OSB and siding, or use corrugated sheet metal, again up to you. If the channel walls are longer than 12', however, you might want to add 4"x4" 45 degree angled bracing posts to keep the walls stiff and straight over time.
Note: On the channel wall, I like to bring the skin up to the truss sill to cover the caster wheels from the elements. Helps to keep the roof rolling in line. Depending on your building, however, you may have to hang soffit off the trusses or hang trim off the truss sill to cover the channel.
For the entrance, get a standard prehung exterior steel door. For security, you might want to get an outside swinging door with pinless hinges. Cut this door to create a 4' lower door and a 2.5' upper door. Attach the upper door to your southern gable, swinging inward, held open with hooks and closed with i-bolts. To stiffen up the southern gable, run a couple 2"x4"s from the bottom of the upper door to the next truss. You'll probably want to brace the north gable as well.
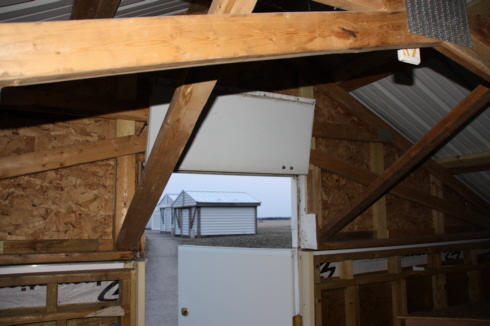

The lower door, of course, goes on your southern wall. To stiffen up the southern wall, install a couple corner tables. Having an upper door and a lower door will allow the roof to shift around in the channel, when you open or close the roof. The scissor trusses, 2.5' upper door and 4' walls should give your telescope close to 6' clearance. If you need more height, make taller walls.
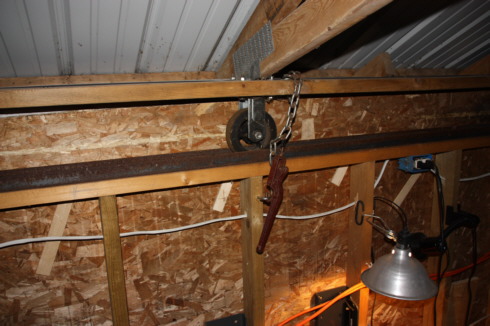
To keep the roof from blowing away, install at least four chain binders (also called load binders), one for each corner of the building. Have a bolt from a caster wheel hold a short section of chain. The chain binder then secures the chain to a big eye-bolt in the wall.
As for the outside posts, I like to use 12" wide sono tubes 2' deep filled with concrete, 4"x4" treated posts, heavy gage 4"x4" post bases. Secure the posts to the channel and to temporary cross braces. Adjust the channel and cross braces until the roof rolls easily in them, then anchor the post bases to the concrete with 3/8" anchor bolts. Nice and strong! Oh, to the outside posts you'll want to add at least a couple 4"x4" 45 degree angled bracing posts to keep your channel straight and true over time. Either that or a couple long cross braces.
Note: After a couple weeks, the outside posts will tend to shrink. Make sure you check, and if necessary, tighten down your post bases.
Our new roll-off roof is small enough to push open and close with one hand. For our big roll-off roof, we installed two AC electric winches. One winch to pull the roof open and one to pull the roof close. No need for pulleys or tow-straps. Nice, more than enough power.
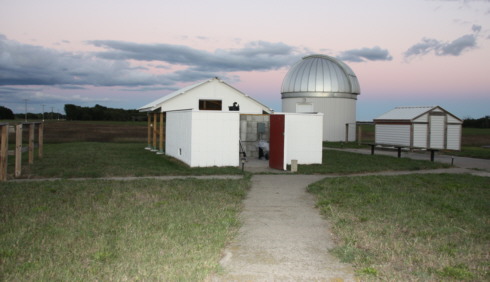
Anyway, that's a short summary on how to build a roll-off. Before you begin, I suggest working with the contractor desk of your local lumber company. They can really help you figure out material required. If you want to know more, read about the rebuild of our big roll-off roof and our new roll-off roof. If I left anything out, you can contact me with your questions.
Couple items to remember: Keep your northern truss flush with the lower wall and let the northern gable plywood overhang the lower wall a bit. That way, your roof can never roll past shut. Oh, put a couple blocks at the northern end of your channel so your roof will never rolls past open. And don't forget to drill couple drain holes in your channel.
[Return to Top]
[Go to Home Page]
Copyright ©
2018 Muskegon Astronomical Society, Inc.
This web page was last updated 08/07/20