The Practical Observatory #2
by Dennis Allen
My local astronomical society wanted to build a new observatory for a couple of years. An observatory to house our 18" dobsonian and another member's 12" fork mount Newtonian. A roll-off roof seems an ideal design, simple to build, quick to open and cool down.
The Observatory Design
Our new observatory will be 16' by 20' building, with a wood floor. It will have a one-piece peaked roof, rolling west. We decided to go west since it's the main source of city lights and storm fronts in our area. We also decided against a two-piece roof. We figured if the roof gets too heavy for one person to move, we could always install an electric winch.
The roof will contain 6 trusses, 16' wide, having a 6/12 pitch and covered in corrugated sheet metal. We will use one regular truss for the west gable and 5 church trusses (also known as scissor trusses) to make our 4' centers. With these trusses, the bottom 2"-by-4" doesn't go straight across. Instead, two 8' horizontal pieces of 2"-by-4" connect to a vertical 2"-by-4", creating an interior 3/12 pitch.
The trusses themselves will rest on two 20' pieces of 2"-by-6" beams. Each truss will be supported by two 6" caster wheels. The caster wheels will ride in 3/16" thick steel channel. This channel will rest on treated 4" by 4" posts, sunk into the ground.
We figured to keep the walls just over 4' tall. We will use whole sheets of 1/2" particle plywood for the walls and cut 16" strips of 1/2" treated plywood for the base. The east wall will have a standard 3'-by-7' door, cut off at the 4' mark. The upper 3' section of door will hang from the eastern gable.
The First Work Party
To build the walls, I picked up nineteen 8' long pieces of 4"-by-4" treated posts, ten sheets of 1/2" particle plywood, four sheets of treated 1/2" plywood (cut into 16" strips), and a box of 1.5" screws.
To start, we measured out and put down our corner posts. All posts were dug about 3' into the ground. As we buried the posts, we made sure to keep everything squared and in 4' centers. We also had to make sure the center of the east wall had a 38" clearance for the door. We secured the whole sheets of 1/2" particle wood about 8" off the ground.
Before the day was over, we dug a trench under the particle wood and proceeded to half bury the 16" strips of treated plywood.
Preparing for The Second Work Party
To prepare for the second work party, I ordered the 16'2" wide fabricated trusses from the local lumber company. I had the local sheet metal shop deliver two 40' sections of 3"-by-1.5"-by-3/16" steel channel. I also picked up the 12 castor wheels, 6 chain binders, and other miscellaneous material.
Before we could put up the trusses, we had to finish putting down the outside rail posts. So during the week, we planted about half the outside posts and dug holes for the rest. Again, staying with 4' centers.
The Second Work Party
We started the work day by burying the remaining outside rail posts. We then used a transit level to mark the cutting line on all posts. We put this line down 8 inches from the top of the plywood, figuring to leave enough plywood to overlay the caster wheels.
Once our posts were cut and trimmed, we installed the channel. We used both tape measure and theodolite to make sure the channel stayed squared. Just as the last screw was countersunk, the lumber company arrived with material.
The lumber company delivered the 5 church trusses, 14 sheets of 10' White McElroy corrugated sheet metal, caps and barn yard soffits. The lumber company also delivered a dozen 12' long pieces of 2"-by-4" and a couple of 20' long 2"-by-6" beams. What wasn't delivered was the regular truss for the west gable. Fortunately, we had a 16' piece of 2"-by-4" and enough scrap material to make it ourselves.
Once we made the western truss, we drilled and bolted all caster wheels to the two 20' 2"-by-6" beams. To secure the trusses, we decided to keep using the wood screws, rather than nails. Screws made it easier to adjust. We started with the east truss, making it flush to the east wall posts. Not the plywood, since the east gable will hang flush.
We secured each truss with brackets and screws. We also screwed down the 2"-by-4" purlins, 4 to a roof side. You need these purlins not only to secure the corrugated sheet metal, but the bard yard soffit.
We fastened the west truss flush with the west wall plywood. This will allow the west gable particle wood to overlap the west wall. We finished the day by securing the remaining purlins. The next day, we hung the corrugated sheet metal, bard yard soffits, and caps.
For the next work party, I ordered a standard 3'-by-7' outdoor steel door from the local lumber company. It swings outside and has pin-less outdoor hinges. I also picked up a door knob and dead-bolt, half a dozen 8' long pieces of 2"-by-4" wood, and three more sheets of 1/2" particle plywood.
The Third Work Party
First, we worked on the eastern gable. For the upper door section, we had to build a 2"-by-2" door frame. Two sheets of 1/2" plywood were then measured and cut to butt right up to the corrugated sheet metal. Notched out for the upper door and 2"-by-4" purlins. This plywood was cut to hang just above the east wall, as not to overlap.
Next, we had to cut the door and door jamb around the 4' mark. Installing the lower 4' door section was pretty straightforward. To install the upper door section, however, we had to reverse the door jamb. Since we still wanted both door sections to line up, the upper jamb had to be positioned away from the building a couple of inches.
We placed our hinges at the top of the upper door, so that it could swing inward. When we want to move the roof, and need extra clearance in the middle, we secure up the upper door with a door latch. To lock the upper door, we added a couple of barrel bolts.
For strength, we used a couple of 5' pieces of 2"-by-4" wood to connect the corners of the upper door jam to the next adjoining truss. This also helps keep the eastern gable flush with the eastern wall.
The western gable was easier to install. All we had to do was to cut and notch out the last two sheets of 1/2" plywood. To keep out the elements, we left a few inches of overhang on the bottom of the gable.
To keep the roof from blowing off, we installed the 6 chain binders. One for each corner of the building, plus 2 in the middle. These chain binders hook to big eye-screws, which are screwed into the 4"-by-4" posts.
Conclusion
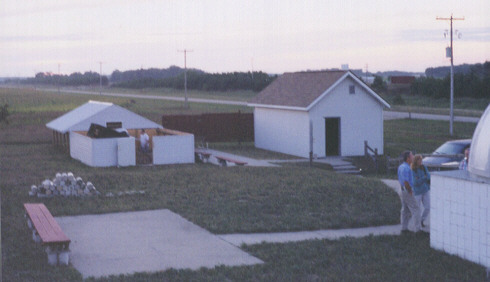
The observatory is basically finished! Oh, there's still work to be done. The vinyl siding has to be installed. We have to install trim and weather stripping around the door. We need corner tables, the building should be wired for electricity, and we also need to put down some sort of wood floor.
I am surprised how easy the roof rolls. This building is almost twice as big as my own roll-off roof observatory, yet it pushes about the same. Once broken in, it should roll even easier.
Another pleasant surprise was the barn yard soffit. It went in perfect. The edge is about one inch short of the wall. The soffit covers the trusses completely, yet doesn't catch on the walls.
Oh, there were a few problems to be sure. We moved the two pieces of channel inward about an inch. So the caster wheels wouldn't rub against the plywood. The net result was that we didn't need 16'2" trusses. We could have ordered 16' wide trusses and saved money.
We had 21' of corrugated sheet metal per roof side. We could have had a full 6" overhang on each gable. Yet, we started the east end with only an 3" overhang. This small overhang is barely enough for the particle wood and vinyl siding.
On the whole, however, we're quite satisfied. We used about the same about of time and personnel to build this observatory as I used to build my own observatory. Considering this observatory is almost twice as big, not bad. Having experience with this design does help.
1997 Events
A year after construction we did manage to install the vinyl siding. The following year we wired the building for electricity and finally got a floor down. We used treated ½" plywood on treated pieces of 2" by 4", two foot centers. Light on the material, but we used lots of dirt to fill up the space between the centers. We should have used ¾" plywood, since the floor is a little soft in places.
Since putting down the floor, we've noticed rain coming from the top vent. I had to put in strips of foam to block the rain. A more permanent solution would be to replace that top aluminum roof cap with a more weatherproof cap.
In the future we'll have to put another layer of plywood down. We also have to find a way to keep the steel channel greased. In the last couple of years the channel has gotten rusty. Next time we'll use galvanized steel channel.
2002 Events
A couple of years since construction and the building remains in fair shape. Had a break-in last year, but the building's design fouled the thieves. As they attempted to pry the upper door, the whole roof rolled just enough for them to lose leverage. The floor is getting soft in places. And since we didn't cover every nook and cranny with plywood, dust tends to be a nuisance. We definitely need another layer of plywood. We got rust building up on the dolly wheels. Need to find a way to keep the channel clean.
2010 Update
Well, the wood floor has gotten too soft to hold a big ladder steady. The north wall has begun to bow out. Even with a chain to pull the walls together, it now takes two people to roll the roof open. It has become too difficult to use the telescopes. For now, we'll just use the building for storage.
2015 Update
After years of talk, we decided to rebuild the roll-off building. We poured a concrete floor, laid one row of foundation blocks and rebuilt the walls. We saved the roof, which remains in great shape. Took several work parties. but we got it done! For details, see "The Practical Observatory #2.5".
[Return to Top]
[Go to Home Page]
Copyright © 2005 Muskegon Astronomical Society, Inc.
This web page was last updated 09/24/15