Please remember to be EXTREMELY CAREFUL
when attempting to observe the sun! Any mistakes can cause permanent, painful damage to your
eyes.
I received the following email from a person I'd had a conversation with on the IRC chat
room #Sciastro. I thought I'd turn my reply into a separate page in case anyone is
interested in making their own solar telescope. Just be sure to follow the instructions
carefully and precisely and feel free to contact me for advice or specifics. Illustrations are
forthcoming, as soon as I get them scanned.
Hi there.....
Excuse me if I've double posted this request, but could you give me more detailed instructions
regarding the solar scope we discussed (or rather, you discussed) tonight in sciastro????????
: )~
I appreciate it : )
Karma
I'd be delighted, Karma, but I guess I should start more or less at the beginning for those that
missed the
conversation. I apologize in advance for the length of this post.
I entered in the middle of the conversation, but essentially you said you were looking for
a way to project the sun's image so you could sketch sunspots. I asked if projection was
mandatory, or if you just wanted to observe the sun. You said just observe, and someone else
was suggesting making a full aperture solar filter. You also stated you had a 4.5" F/9
reflector in mind for the project. This is pretty much where my ears perked right up. :-)
I mentioned I had a solar telescope of a design by Rik Hill, one of the coordinators of
the solar section of the American Lunar and Planetary Observers, (ALPO). Mine consists of
a 4.5" F/4.5 equatorially mounted Newtonian reflector telescope from Tasco, (his is a 6" F/9)
with no coatings on the mirrors whatever, just polished glass. (I was able to remove the
coatings by immersing the mirrors in a solution from Radio Shack called Ferric Chloride.
It's used to etch excess copper from electronic circuit boards. It took about 20 minutes.)
"Mirrors" like this reflect only 4% of the light hitting them, thus the total light
transmitted to the eye piece is only 0.16% of the light from the sun. This is right on par
with the amount transmitted through full aperture filters. (My Thousand Oaks Type II I use
on my C8 transmits 0.14%.) You can hold your hand right at the focus of this solar scope
and feel no heat from the image at all.
The only risk, and it is considerable, is from ultraviolet and infrared wavelengths.
These are in turn blocked by a filter fashioned from #8 GREEN welders glass cut and shaped
to fit in a standard screw on eyepiece filter holder. (I used a #80 blue filter. Remove
the retaining ring from underneath the filter and the filter will drop out. Use this as
a template for the new green filter. You can cut the glass close to size with a Dremel
tool fitted with a diamond cutting wheel. (They're the grey ones.) Final shaping I did
with a knife sharpening stone in a bowl of water while I watched the news on TV. Rounding
the edges to size took a couple hours. Place it in the filter holder, replace the retaining
ring and presto!) You MUST use the green glass, not the gold plastic. Several people in
the know beat me up pretty good about this. Seems the gold, easy to use stuff does not reject
infrared radiation sufficiently. The green, hard to shape glass does. NO CUTTING CORNERS
HERE! Your eyesight is too important to play with!
So, once the glass parts are assembled, you should paint the back of the secondary flat
black, plus the secondary holder, along with the side (front?) of the mirror cell that faces
the sun, and the inside of the telescope tube, making certain to coat the side opposite the
eyepiece. The outside of the scope can be painted white or left alone, whatever you choose.
(I find the white tube stays cooler when I move the scope around, but it's not that
important.)
Wait for the paint to dry, put it together, collimate it and you're ready for first light.
It's easy to find the sun with this scope because, as I said, most of the light goes right
through. This leaves a distinct shadow of the secondary on the primary. Simply align the
shadow with the center of the primary and there it is. On first look, I'd recommend just
taking out the eyepiece and holding your hand up to the focuser. You should just barely
see the light from the sun on your hand.It shouldn't be much brighter than ambient light.
If this is what you see, go ahead and screw the filter on a medium wide angle eyepiece,
(I use my 18mm, but my scope is only an F/4.5. You may select another one, perhaps a 25mm
or so.), and give it a shot. The sun will appear green, but it should come nicely to focus,
revealing all manner of high contrast details.
This about covers it. If you have ANY other questions or concerns do not hesitate to
ask me! If I don't know the answer, I can find out from the source just what the answer is.
PLEASE DO NOTHING UNTIL YOUR QUESTION IS ANSWERED. I don't mean to shout, but the importance
of proper operation of this telescope is critical. Depending on the scope, there are also a
number of contrast improvements to check for, but get the thing to this stage first, and I can
ask you to check certain details for improvement later.
I sure hope this helps, and that you'll remeber to be safe when viewing the sun, and
not to hesitate at all in asking questions, ok?
Clear skies, day and night!
Astroman
Click on images for full size
|
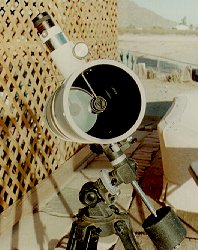
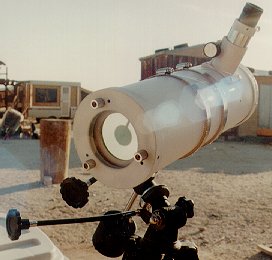
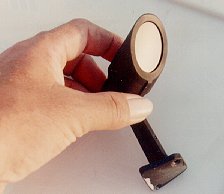
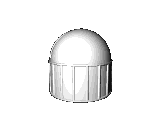
The solar scope completed from the front on the left and from the rear on the right.
You can see the shadow of the secondary on and through the primary respectively.
When the scope is properly collimated, you can just line up the shadow in the center to find
the sun, so no DANGEROUS finder scope is necessary. See how the outside is white to reflect
heat away and the inside is black to cut scattered light.
The rings are large hose clamps,
covered with felt to prevent scratching the tube. This also facilitates turning the tube to
a more comfortable viewing angle as the sun moves across the sky. |
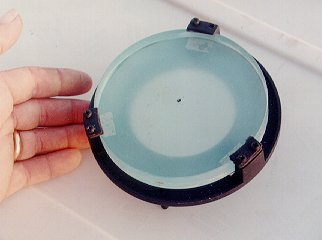 |
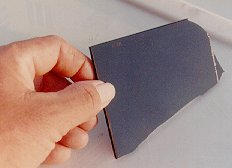
The "heart" of the whole thing-the UNCOATED primary mirror. A "mirror" like this reflects
only 4% of the light striking it, the rest goes right through, as seen above. Notice that the
mirror cell is painted black to cut down scatter and increase contrast. This is a recurring
theme throughout. Another suggestion to increase contrast is to polish the back of the main
mirror at an angle away from the secondary. Thus, more light would go through instead of being
scattered and be sent off on a tangent, away from the secondary, thus preventing secondary
reflections and affecting focus. Phew! You can also see the dot marking the center of the
main. This is used for collimation and affects the performance not at all, since the
secondary blocks any light from reaching this part of the mirror. |
 |
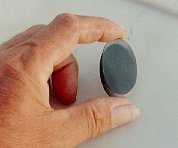
Here we see a front and back view of the secondary mirror. It is not coated on the front
and painted black on the back. Here again, it reflects only 4% of the light reaching it.
You kinda have to be careful, because I discovered my standard secondary is about 10% smaller
than it needs to be. This from the manufacturer.
When I painted the secondary black and
tried it, the increase in contrast was amazing! Just that simple act made the view better
by a factor of 2 or better. |
 |
Here's the secondary mounted in the diagonal, which is also painted flat blck to reduce
scatter. |
 |
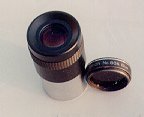
The image on the left shows the 18mm Ultima eyepiece I use and the hand cut welder's glass
filter installed in the "stolen" filter blank. Not a great picture.... The image on the
right shows the parts. On top left is the #80 Blue filter. Top right is the welder's glass
filter. Bottom left is the filter blank, bottom right is the retaining ring. The 18mm ep
gives a field of view of just under 1 degree, so when set up for the public, it starts on
one side and drifts to the other in a minute or two. When carefull observations are under
way, I usually use a barlow lens to double the magnification. |
 |
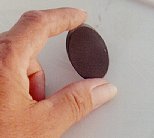
And finally, this is a chunk of #8 welders glass. You can cut it CAREFULLY with a Dremel
tool, as described above. Be ready to spend several lovely hours shaping the edges to
roundness! |

Page URL: http://www.stargazing.net/Astroman/21699.html
Copyright 2000, Steve Dodder
Webmaster: Steve Dodder
Revised: 7/19/00
